Last Updated 2011/09/21
このページでは WPF のグラフィックスを取り上げます。初心者向けのテーマはアチコチのサイトにありますので、ここでは実践的な問題に焦点を合わせることにします。なお、測定単位(デバイスに依存しない単位の意味)と em サイズについては、「WPF の基礎知識」のほうで触れていますで、そちらを参照してください。
Windows プログラミングにおいて、無効化領域の再描画処理はグラフィックスの基本です。Windows フォームアプリケーションでは Paint イベントを利用するか、OnPaint メソッドをオーバーライドすることで、WP_PAINT メッセージを処理することができます。しかし、WPF には同じ名前のイベントやメソッドがありません。
無効化 "invalidate" とは、描画した効果が失われるという意味です。たとえば、あるアプリケーションがフォームを表示しているところに、別のアプリケーションのフォームを重ねたあと、別のフォームのほうを移動させると、元のフォームの描画内容が失われます。そこで、Windows は WM_PAINT メッセージを元のフォームを表示しているアプリケーションに送り、アプリケーションが再描画の処理を実行します。
Visual Basic の一部のコントロールには AutoRedraw プロパティがあって、true を設定しておくと、再描画を自動的に実行してくれる機能があります。WPF でもこれにならったのでしょうか、再描画という概念がなくなったといえるでしょう。つまり、必要な再描画は WPF が担当します。
ところで、CompositionTarget クラスというものがあります。クラス名だけをみると、IME に関係しているのかと思ってしまいますが、WPF SDK のこのクラスに対する説明は、「アプリケーションの表示サーフェイスをあらわします。」とあります。
「表示サーフェイス」を最初は、.Net Framework の Graphics クラスのようなものかと考えましたが、そうでもありません。いえ、「少なくとも、表示サーフェイス」ではありません。この表現はこのクラスを作った人の立場からみたもので、クラスを利用する側に対する説明としては適切さを欠くと言えるでしょう。
このクラスにどうして "composition" を付けたのか分かりませんが、WPF SDK に付属のサンプルプロジェクトなどを見る限り、アプリケーションを再描画するときに Rendering イベントが発生するだけのように思えます。つまり、アプリケーションが WM_PAINT メッセージを受け取ったときに発生する Rendering イベントを利用して必要な描画をするチャンスが得ることができます。
CompositionTarget クラスを使う簡単なコードを示します。
フォームに Canvas コントロールだけを配置し、次のように設定してください。キャンバス内でマウスポインタを移動すると、その位置に応じてフォームの背景色を変化させます。
<Canvas Name="canvas1" MouseMove="canvas1_MouseMove" Height="200" Width="300" />
分離コードは以下のとおり。
namespace CompositionTargetSample
{
  public partial class Window1 : Window
  {
    private Point FPoint;

    public Window1()
    {
      InitializeComponent();

      // Rendering イベントのハンドラを設定する
      CompositionTarget.Rendering += UpdateColor;
    }

    private void UpdateColor(object sender, EventArgs e)
    {
      byte red = (byte)(FPoint.X / 2.0);
      byte blue = (byte)(FPoint.Y / 1.5);
      canvas1.Background = new SolidColorBrush(Color.FromRgb(red, 0x80, blue));
    }

    private void canvas1_MouseMove(object sender, MouseEventArgs e)
    {
      FPoint = e.GetPosition((UIElement)sender);
    }
  }
}
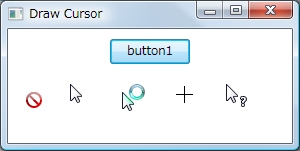
これは一般受けするテーマではありませんが、WPF クラスライブラリリファレンスを作成する過程で、Cursors クラスや CursorType enum 型の解説文中にカーソルのイメージが必要となりましたので、調べて見ました。
System.Windows.Forms.Cursor クラスには Draw メソッドがありますが、WPF の Cursor クラスには何の機能もありません。つまり、ゴリゴリとコードを書くほかないようです。
いずれにしろ、Windows がリソースとして持つカーソルを使っているのですから、それを手がかりにして取り出せばよさそうです。リソースの ID は、winuser.h と penwin.h の中にあります。詳細は、WPF クラスライブラリリファレンスを見てもらうとして、ここでは下図のようにカーソルを描画するテクニックを紹介します。
リソース ID から Windows API 関数の LoadCursor 関数を使ってカーソルへのハンドルを取得し、それから System.Windows.Forms.Cursor オブジェクトに変換します。次に、System.Windows.Forms.PictureBox コントロールを使って、その Graphics オブジェクトを取得し、それに対して Cursor クラスの Draw メソッドを適用します。
<Window x:Class="CursorTest.Window1"
    xmlns="http://schemas.microsoft.com/winfx/2006/xaml/presentation"
    xmlns:x="http://schemas.microsoft.com/winfx/2006/xaml"
    xmlns:winform="clr-namespace:System.Windows.Forms;assembly=System.Windows.Forms"
    Title="Draw Cursor" Height="300" Width="300"
  >
  <StackPanel Orientation="Vertical">
    <Button Name="button1" Width="80" Height="25" Click="button1_Click" Margin="10">button1</Button>
    <StackPanel Orientation="Horizontal">
      <WindowsFormsHost Width="32" Height="32" Margin="10">
        <winform:PictureBox x:Name="picBox1" />
      </WindowsFormsHost>
      <WindowsFormsHost Width="32" Height="32" Margin="10">
        <winform:PictureBox x:Name="picBox2" />
      </WindowsFormsHost>
      <WindowsFormsHost Width="32" Height="32" Margin="10">
        <winform:PictureBox x:Name="picBox3" />
      </WindowsFormsHost>
      <WindowsFormsHost Width="32" Height="32" Margin="10">
        <winform:PictureBox x:Name="picBox4" />
      </WindowsFormsHost>
      <WindowsFormsHost Width="32" Height="32" Margin="10">
        <winform:PictureBox x:Name="picBox5" />
      </WindowsFormsHost>
    </StackPanel>
  </StackPanel>
</Window>
分離コード
using System;
using System.Collections.Generic;
using System.Windows;
using System.Windows.Controls;
using System.Windows.Input;
using System.Windows.Media;
using System.Runtime.InteropServices;
using System.Security;
using System.ComponentModel;
using System.Windows.Forms.Integration;
using System.Drawing;

namespace CursorTest
{
  public partial class Window1 : Window
  {
    [DllImport("user32.dll", CharSet = CharSet.Auto, SetLastError = true)]
    private static extern IntPtr LoadCursor(HandleRef hInstance, IntPtr iconId);

    [DllImport("user32.dll", CharSet = CharSet.Auto, ExactSpelling = true)]
    private static extern bool DestroyCursor(IntPtr hCursor);

    // CursorType enum 型に対応するリソース ID
    private int[] CursorTypes = new int[]
    {
      0,     32648, 32512, 32650, 32515, 32651, 32513, 32646, 32643, 32645,
      32642, 32644, 32516, 32514, 32649, 32631, 32652, 32653, 32654, 32655,
      32656, 32657, 32658, 32659, 32660, 32661, 32662, 32663
    };

    //-----------------------------------------------------------------------------------
    public Window1()
    {
      InitializeComponent();
    }

    private void button1_Click(object sender, RoutedEventArgs e)
    {
      // カーソルのハンドルを取得する
      IntPtr hCursor = this.LoadCursorFromCursorType(CursorType.No);

      // System.Windows.Forms.Cursor オブジェクトを作成する
      System.Windows.Forms.Cursor cursor = new System.Windows.Forms.Cursor(hCursor);

      // PictureBox に描画する
      cursor.Draw(picBox1.CreateGraphics(), new System.Drawing.Rectangle(0, 0, 32, 32));

      // カーソルのハンドルを開放する
      DestroyCursor(hCursor);

      // スマートさに欠けるが、ほかにいい手を思いつかなかったので

      hCursor = this.LoadCursorFromCursorType(CursorType.Arrow);
      cursor = new System.Windows.Forms.Cursor(hCursor);
      cursor.Draw(picBox2.CreateGraphics(), new System.Drawing.Rectangle(0, 0, 32, 32));
      DestroyCursor(hCursor);

      hCursor = this.LoadCursorFromCursorType(CursorType.AppStarting);
      cursor = new System.Windows.Forms.Cursor(hCursor);
      cursor.Draw(picBox3.CreateGraphics(), new System.Drawing.Rectangle(0, 0, 32, 32));
      DestroyCursor(hCursor);

      hCursor = this.LoadCursorFromCursorType(CursorType.Cross);
      cursor = new System.Windows.Forms.Cursor(hCursor);
      cursor.Draw(picBox4.CreateGraphics(), new System.Drawing.Rectangle(0, 0, 32, 32));
      DestroyCursor(hCursor);

      hCursor = this.LoadCursorFromCursorType(CursorType.Help);
      cursor = new System.Windows.Forms.Cursor(hCursor);
      cursor.Draw(picBox5.CreateGraphics(), new System.Drawing.Rectangle(0, 0, 32, 32));
      DestroyCursor(hCursor);
    }

    private IntPtr LoadCursorFromCursorType(CursorType cursorType)
    {
      IntPtr handle = IntPtr.Zero;

      if (cursorType != CursorType.None)
      {
        handle = LoadCursor(new HandleRef(this, IntPtr.Zero), (IntPtr)CursorTypes[(int)cursorType]);

        if (handle == IntPtr.Zero)
        {
          throw new Win32Exception();
        }
      }

      return handle;
    }
  }
}
反転色とは、下図に示すように、背景色に対して対比的な色です。色を選択したとき、その色の値を文字列として表示したい場合に使えます。メソッドにしておきましたので、ご利用ください。
![]()
// 指定の色の反転色を取得する
private Color GetInvertColor(Color color)
{
  byte A = color.A;
  byte R = (byte)(255 - color.R);
  byte G = (byte)(255 - color.G);
  byte B = (byte)(255 - color.B);

  return (Color.FromArgb(A, R, G, B));
}
反転色(1)では背景色に対する反転色を得る手順を説明しましたが、場合によっては反転色の文字色が背景色に近いために判読が難しいケースがあります。そこで、その改善策を示します。
背景色のグレースケール値を取得し、それを色の濃さの中間値である 128 より大きい値の場合は文字色として黒色を、その逆の場合は白色を採用します。
  int grayScale = 0.299 * backgroundCcolor.R + 0.587 * backgroundCcolor.G + 0.114 * backgroundCcolor.B;

  if (grayScale > 128)
    textColor = Colors.Black;
  else
    textColor = Colors.White;
標準 WEB カラーでテストしたところ、背景色と文字色とが判別不可能なケースはありませんでした。
WPF のグラフィックス関係の機能の中で、ほしいのにない機能の筆頭はテキストの幅を取得する簡単な方法がないことです。.Net Framework の Graphics クラスであれば、MeasureString メソッドを使えばテキストの幅と高さを取得することができます。
WPF では意外なところにそのための機能があります。FormattedText クラスには Width プロパティと Height プロパティとがあって、これがテキストの幅と高さを返します。テキストの幅と高さを取得するメソッドにしておきました。
以下のコードでは textBox1 のフォントの設定に基づいてテキストの幅と高さを取得しています。なお、複数行の場合は、行間隔に行数をかけた高さになります。
private void button1_Click(object sender, RoutedEventArgs e)
{
  Typeface typeFace = new Typeface(textBox1.FontFamily, textBox1.FontStyle,
      textBox1.FontWeight, textBox1.FontStretch);

  Size size = this.MeasureString(textBox1.Text,textBox1.FontSize, typeFace);

  Title = size.ToString();
}

//---------------------------------------------------------------------------------------
// テキストの幅と高さを取得する
private Size MeasureString(string text, double fontSize, Typeface typeFace)
{
  FormattedText formattedText = new FormattedText(text, System.Globalization.CultureInfo.CurrentCulture,
       FlowDirection.LeftToRight, typeFace, fontSize, Brushes.Black);

  return new Size(formattedText.Width, formattedText.Height);
}
System.Drawing 名前空間の Bitmap クラスには GetPixel メソッドがあります。これはビットマップ上の指定の位置のカラー値を取得するものです。しかし、これに相当する機能が WPF のほうにはありません。そこで、作ってみました。
以下のコードは、フォームに image1 を配置し、適当な画像ファイルを表示しているとき、画像上をマウスでクリックした位置のピクセル色をフォームの背景色として設定します。
private void image1_MouseLeftButtonDown(object sender, MouseButtonEventArgs e)
{
  // マウスでクリックした位置
  Point point = Mouse.GetPosition(image1);

  // 指定の位置のカラー値を取得する
  Color color = this.GetPixel((int)point.X, (int)point.Y);

  // フォームの背景色として設定する
  this.Background = new SolidColorBrush(color);
}

private Color GetPixel(int x, int y)
{
  BitmapSource bmp = image1.Source as BitmapSource;

  int w = Convert.ToInt32(bmp.Width);
  int h = Convert.ToInt32(bmp.Height);

  int stride = Convert.ToInt32((w * bmp.Format.BitsPerPixel + 7) / 8);
  int[] array = new int[w * h];

  // ピクセルデータを配列にコピーする
  bmp.CopyPixels(array, stride, 0);

  int index = x + y * w;

  return this.GetColorFromValue(array[index]);
}

// int 型を Color 型に変換する
private Color GetColorFromValue(int value)
{
  byte R = (byte)(value >> 16);
  byte G = (byte)(value >> 8);
  byte B = (byte)(value);

  return Color.FromRgb(R, G, B);
}
System.Drawing 名前空間の Bitmap クラスには GetThumbnailImage メソッドがありますが、WPF にはそれに相当する機能がありません。そこで、作ってみました。
// fileName : 画像ファイル名
// width    : サムネイルの幅
// height   : 同、高さ
private ImageSource GetThumbnailImage(string fileName, int width, int height)
{
  byte[] buffer = System.IO.File.ReadAllBytes(fileName);
  System.IO.MemoryStream stream = new System.IO.MemoryStream(buffer);

  BitmapImage bitmap = new BitmapImage();
  bitmap.BeginInit();
  bitmap.DecodePixelWidth = width;
  bitmap.DecodePixelHeight = height;
  bitmap.StreamSource = stream;
  bitmap.EndInit();
  bitmap.Freeze();

  return bitmap;
}
メソッドを利用する分離コード
private void button1_Click(object sender, RoutedEventArgs e)
{
  ImageSource image = this.GetThumbnailImage("../../images/RedRose.jpg", 40, 40);

  image1.Source = image;
}
WPF アプリケーションではなにかとグラデーションを使いたくなります。しかし、気に入るグラデーションを作るのはなかなか面倒な作業です。そこで、何かよいツールはないかと探してみましたが、これというものはありません。と思っていたら、手近なところにあることに気付きました。「開発ツール」のページで紹介する KaXaml です。
下図は、以下に示すコードを実行したところですが、右端のボタンの背景色のように実情に合わせてテストできます。Color プロパティを手入力で設定しなければならない点だけが欠点といえるでしょう。

<Page
  xmlns="http://schemas.microsoft.com/winfx/2006/xaml/presentation"
  xmlns:x="http://schemas.microsoft.com/winfx/2006/xaml">

  <Page.Resources>
    <LinearGradientBrush x:Key="brush1" StartPoint="0.5, 0" EndPoint="0.5, 1">
      <GradientBrush.GradientStops>
        <GradientStop Color="White" Offset="0.0"/>
        <GradientStop Color="Silver" Offset="1.0"/>
      </GradientBrush.GradientStops>
    </LinearGradientBrush>

    <!-- 虹色 -->
    <LinearGradientBrush x:Key="brush2" StartPoint="0.5, 0" EndPoint="0.5, 1">
      <GradientBrush.GradientStops>
        <GradientStop Color="Red" Offset="0" />
        <GradientStop Color="OrangeRed" Offset="0.10" />
        <GradientStop Color="Yellow" Offset="0.35" />
        <GradientStop Color="LimeGreen" Offset="0.45" />
        <GradientStop Color="Blue" Offset="0.65" />
        <GradientStop Color="Navy" Offset="0.80" />
        <GradientStop Color="Purple" Offset="0.95" />
      </GradientBrush.GradientStops>
    </LinearGradientBrush>

    <LinearGradientBrush x:Key="brush3" StartPoint="0.5, 0" EndPoint="0.5, 1">
      <GradientBrush.GradientStops>
        <GradientStop Color="LightSkyBlue" Offset="0.0"/>
        <GradientStop Color="RoyalBlue" Offset="0.6"/>
        <GradientStop Color="MediumBlue" Offset="1.0"/>
      </GradientBrush.GradientStops>
    </LinearGradientBrush>
  </Page.Resources>

  <StackPanel Orientation="Horizontal">
    <Rectangle Width="100" Height="200" Margin="10" Fill="{StaticResource brush1}" />
    <Rectangle Width="100" Height="200" Margin="10" Fill="{StaticResource brush2}" />
    <Rectangle Width="100" Height="200" Margin="10" Fill="{StaticResource brush3}" />
    <Rectangle Width="24" Height="24" Margin="10" Fill="{StaticResource brush3}"
               Stroke="MediumBlue" StrokeThickness="1" />
  </StackPanel>
</Page>
.Net Framework 標準の 140 色では不十分な場合は、「Software」のページで紹介する ColorPicker を利用する手もあります。
−以上−